Sunday, 12 February 2017

Baby Bunny

I've got another sneaky peek sample of one of the new trio images due out soon from Lili of the Valley, also featuring some beautiful satin ribbon from The Ribbon Girl.


Card Recipe:


From Lili of the Valley:

From The Ribbon Girl:
From Dies To Die For:
Other:
  • Watercoloured with Ranger Distress Ink Reinkers
  • The Langton Watercolour paper
  • 15mm Blue Open Roses
  • 10mm Blue Open Roses
  • Cosmos Daisy Flower
  • Mini Rose Buds
I've been inspired by:
  • Simon's Wednesday Challenge - Cute
Happy crafting
Annette
xx


Saturday, 11 February 2017

Sweet Pea

Today's card was made for a colleague whose birthday is today. I hope it's sufficiently masculine so I kept it quite simple.  It features Sweet Pea from Lili of the Valley and some matching garden themed papers.


Card Recipe:


From Lili of the Valley:

Other:
  • Watercoloured with Ranger Distress Ink Reinkers
  • The Langton Watercolour paper
  • Graphic 45 Secret Garden Paper pad

I've been inspired by:

Happy crafting
Annette
xx


Thursday, 9 February 2017

Daffodil Bunny

There's a new release at Lili of the Valley featuring some of my favourite bunnies, so I've made a Spring-like card using one of the new images.  It's doubling up as my As You Like It Challenge sample too because the theme this week is ribbons or lace.  My choice is easily ribbon, and my most used ribbon is the 15mm satin ribbon which is what I've used on this card. I think I have this style of ribbon in every colour and shade possible (although always manage to find one more shade I need!). I also like making the double bows that I've added here too.


Card Recipe:

From Lili of the Valley:

From Dies To Die For:
Other:
I've been inspired by:
Happy crafting
Annette
xx


Wednesday, 8 February 2017

Tiny Dancers (Twice)

Well, today is my first day designing for Dies to Die For and I've got not one, but two samples. This wasn't originally intentional, but I spent so long on the no-lines version of the Tiny Dancers image that when I'd finished it I decided to make a 'normal' lines version to compare how long it had taken.  And my empirical study concluded that it took at least 3 times longer to colour the no-lines version.  That's just to colour it, not to make up the whole card!  Hence I kept the second version CAS while there are lots of embellies on my first version!


I also 'outlined' the no-lines version with Tumbled Glass before I started to colour the main image.


And now here's the 'normal' version....


Card Recipe:


From Dies To Die For:
Other:
Created for:


I've been inspired by:

  • Penny Black & More - Favourite Stamp (It grew on me so I've used it twice!)
Happy crafting
Annette
xx


Monday, 6 February 2017

Wedding Couple

I'm sharing another image from the soon-to-be-released trio sets from Lili of the Valley and it's really CAS.  I printed the digi quite large, die cut it out and layered it on foam pads on a flock style backing paper embellished with a gorgeous piece of purple satin ribbon.  I layered the die cut image on a layer of purple card slightly offset so that it gave the image panel some definition. I hope you like it!


Here's a close up of my image panel.


Card Recipe:


From Lili of the Valley:

From The Ribbon Girl:
Other:
  • Watercoloured with Ranger Distress Ink Reinkers
  • The Langton Watercolour paper
  • DCWV Solid Flock Stack Paper Pad
  • Marianne Designs Craftables Circle and Flower Stitch

I've been inspired by:

  • Country View Challenges - 30 mins (watercoloured using reinkers from CVC)
  • Simon's Monday Challenge - Young at Heart
Happy crafting
Annette
xx


Sunday, 5 February 2017

Love Petals, Thetford news and a new chapter!

I'm not sure where this week has gone! I had good intentions of writing a post mid-week after my exploits of the previous weekend, but here I am at another Sunday already!  

Anyways, as you know it was the Sincerely Yours papercraft show at Thetford last weekend.  About a week before the show, my lovely, uber talented friend Squirrel said that she was going and I was desperate to meet her in person.  My similarly adorable and talented friend Sue said she, and possibly Kat, were also going and I could go with them. But Sue thought that Thetford from Gloucester was about 2.5 hours and I'm another 2.5 hours further West than Gloucester.  The 5 hour journey was putting a bit of a dampener on the whole thing and after a bit (OK, quite a lot) of umming and ahhing with Squirrel and hubby, I decided to be realistic and listen to my head instead of my heart. 

Then I slept on the idea and changed my mind.

The amazing Sue offered to let me stop overnight at her house which meant that it didn't take me long to ignore my head and follow my heart again!  

The reality of seeing so many of my lovely crafting buddies (Sue, Kat, Faye, Debs and of course, the chance to finally meet Squirrel) was amazing and there was a lot of hugging and a fair amount of squealing.  I am so grateful to Sue for making the weekend possible for me.

And as if that wasn't enough news, I also met the lovely Tracy from Dies to Die For and I am absolutely overwhelmed to report that she's asked me if I would like to join her wonderful team of designers.  So a new chapter starts and my first DT card will be next week!  Eeeek!  Please wish me luck! :0)

Anyway, among all that excitement I need to tell you a little bit about today's card.  I've been efficient and combined one card for both my Guest spot at The Ribbon Girl and also the newly released cuties at Lili of the Valley.  The image I've used is called Love Petals.

So without further ado, here's my card.  


Card Recipe:


From Lili of the Valley:

From The Ribbon Girl:
From Dies To Die For:
Other:
  • Watercoloured with Ranger Distress Ink Reinkers
  • The Langton Watercolour paper
  • Sizzix Stitched Oval Tim Holtz Thinlet dies
  • Mini silver brad
  • Kort and Godt white chrysanthemum
I've been inspired by:
Happy crafting
Annette
xx


Tuesday, 31 January 2017

Otterly Lost Without You Too

I got back home yesterday from an amazing (and very last minute) trip to meet some of my lovely crafting friends, but I'm so shattered as I write this post, that I will save telling you about it until my next post.  All I'll say for now is that it was overwhelming to meet so many of my crafting buddies in one place and I am so thankful that one in particular made it possible for me to meet another of my closest blogging buds.  I really have made some lovely friends in blogland and this weekend confirmed that.

For today, I'm sharing the forth and final from my set of Otter cards and I've reverted back to the first image I used (I think he's my favourite, as is the sentiment!)

I've added another starfish charm using some button twine and the corrugated card again.  I thought that the chevrons on it looked a bit like waves! :0)


Card Recipe:
I've been inspired by:
Happy crafting
Annette
xx


Saturday, 28 January 2017

Have an Otterly Great Birthday

It's the third of my Otter cards today, and this one is a birthday card. I've added a couple of fishies on this one, including a really cute one popping his head above the waves to peek at the otter. I hope he doesn't peek too long or he may find he's turned into the otter's lunch!


Card Recipe:
I've been inspired by:
Happy crafting
Annette
xx


Thursday, 26 January 2017

Hearts & Flowers

I am SUPER excited to be a guest designer at The Ribbon Girl for 3 months and this is the first card I'm sharing since joining Mary's team!   As well as using lots of lovely goodies from the shop, I'm also showcasing a new image from Lili of the Valley called Hearts & Flowers which is due to be released on Saturday.

And finally, (yes there's more!) there's a new challenge starting at As You Like It Challenge today, where we want to know what your favourite flowers are.  After a bit of thought, I decided mine were roses and so I'm counting the rose that the little mouse is holding as well as the rose bud and open rose embellishments  I use these roses a lot, and I also love using the chrysanths and lilies that also feature on my card.  


Card Recipe:

From Lili of the Valley:
From The Ribbon Girl:
Other:
I've been inspired by:
Happy crafting
Annette
xx


Wednesday, 25 January 2017

There's No Otter Like You

I've got some more MFT otters for you today, this one using a sentiment from the set too.  I've added some corrugated card at the top, edged with a stitched border and added some twine and a small starfish charm to continue the ocean theme.


Card Recipe:
I've been inspired by:
Happy crafting
Annette
xx


Monday, 23 January 2017

Floating

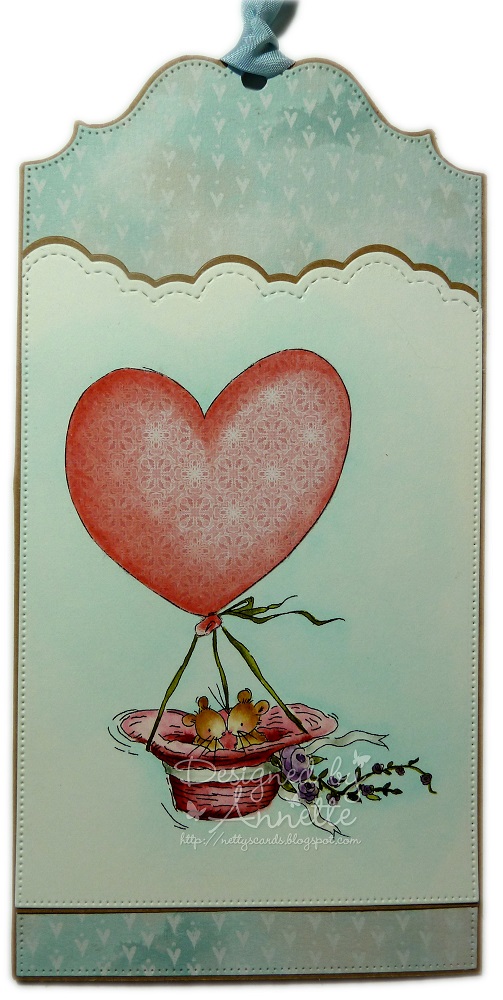
I've got another sneeky peek for Lili of the Valley today using an image called Floating. The pair of mice are adorable although the balloon scared me a little, so I cheated and paper pieced it.  I then shaded the designer paper with some Copics so it didn't look too flat. The new LOTV images are released on Saturday, so you've not got long to wait now!  

Here's a little close up of the cute meecies:


And here they are floating in their balloon on the tag:


Card Recipe:


From Lili of the Valley:

From The Ribbon Girl:
Other:
I've been inspired by:
Happy crafting
Annette
xx


Sunday, 22 January 2017

Boating

There's a love themed new release from Lili of the Valley coming out next Saturday and today I've been lucky enough to play with one of the cute animals from the set. There are 5 animals and 2 people images in the set, and they're really sweet.  

I'm using my Crealies dies again (I really love these!) and some pretty papers from The Ribbon Girl.  I'll have a couple more sneaky peeks from the new release to share with you next week. :0)


Card Recipe:


From Lili of the Valley:

From The Ribbon Girl:
Other:
I've been inspired by:
Happy crafting
Annette
xx


Saturday, 21 January 2017

Otterly Lost Without You

I've got a couple of Otterly Cute cards to share with you over the next few days as I've been busy with a lovely new set of stamps from the latest MFT release.  This one is really sweet holding its little baby otter, and the sentiment is really lovely too.  I used a swirl embossing folder for the top pelmet to try to make it look like waves!


Card Recipe:
I've been inspired by:
Happy crafting
Annette
xx


Thursday, 19 January 2017

Is it nearly Christmas?

We're asking "What's New" at In The Pink this fortnight and I've used it as an excuse to make a start on my 2017 Christmas cards (on the basis it was one of my New Year Resolutions to make 2 Xmas cards each month and I've made zip to date!).

I've used my own teapot template (see freebie on my Freebies page) and my new Pingu stamp which was a Christmas pressie from the lovely Squirrel.


I've also started outlining my images BEFORE I start painting them because I have found I smudge the colours less.  When I paint my image I am usually impatient and outline it as soon as I finish it. The colours then tend to bleed into the halo around the outside. Therefore I've decided to (try to) plan ahead and stamp and outline the night before I want to colour an image, and then by the time I get to it the next day, it's dry and less likely to bleed.  This is my image before I started colouring properly, outlined in Weathered Wood reinker.  If you look in the above coloured image, you can hardly see it, although it looks quite dark before any other colours are applied.


Card Recipe:

Created for:


Sponsored by:


I've been inspired by:
Happy crafting
Annette
xx


Wednesday, 18 January 2017

Sending Hedgehugs

Hello, I'm back again with some more of those cute hedgeies!  This time they've multiplied and and there's now two of them playing on the log!  I was quite pleased with how this one turned out, and I kept the layout very CAS this time with a simple corrugated pelmet and a stamped sentiment from the stamp set.


Card Recipe:
I've been inspired by:
Happy crafting
Annette
xx


Thursday, 12 January 2017

Dorothy the Dreamer

We're talking hair colour combos at As You Like It Challenge today.  I debated using Copics which I'm more comfortable with when it comes to hair, but decided to persevere with my paintbrush.  I've used my 'go-to' colours of Antique Linen base with Brushed Corduroy, Vintage Photo and a touch of Ground Espresso working up to the darkest bits.  Considering there's not much in the way of hair in this image, I've managed to use 4 shades!  Brown hair is my favourite probably because I have more browns than any other colour. Obviously nothing to do with it being the colour of chocolate (although that certainly helps!)


Card Recipe:
I've been inspired by:
Annette
xx


Saturday, 7 January 2017

Deja Vu

You may have read my post just after Christmas saying that some personalised cards I'd made sadly hadn't reached their recipient. :0(   Anyway, I've made a replacement for the baby card as well as a little extra goodwill gesture in the form of a keepsake wall hanger.

Both items feature cuties from Lili of the Valley and lots of frilly stuff from The Ribbon Girl.  I was pleased how they turned out, even though it was heartbreaking to know the first set had been lost after all the effort that had gone into them.


The wall hanger is actually quite large, bigger than it looks her in comparison to the card, but even so the letters I've used (my new CCD Jumbo Alphabet) look mahoosive!  I've die cut them 3 times and layered the top designer paper onto thick purple cardstock to keep them strong as the paper was too flimsy. They're raised up on foam pads too for added dimension.


Card Recipe:
I've been inspired by:
Happy crafting
Annette
xx


Wednesday, 4 January 2017

Hedgehugs

I ordered these adorable MFT hedgehogs over Christmas and I inked them up the day they fell onto my doormat!  I stamped one of the hedgies, a log for him to relax on, an extra leaf on the log and a toadstool by masking the elements to create this little scene.  The stamps were inked in pale grey for the no-lines technique.   I think he's adorable!


Here he is a bit closer up:

Card Recipe:
I've been inspired by:
Happy crafting
Annette
xx


Monday, 2 January 2017

Thank You

Like most of us, I was excited to use a few of my new craft items and I've have managed to combine a couple of them into some large tag shaped cards.

I fell in love with these oversized Crealies stitched tag dies as soon as I opened them. They were a Xmas present from a lovely blog pal who I won't name in case she's shy, (but thank you sweetie).

I've used them to showcase my new Lili of the Valley critters from the newly released trios sets. There are 4 nesting tags in the set and this is the second smallest.  I thought they could also be used for bookmarks as well as standard tags, but these ones are folded into standing cards.

I've decorated my first tag with some gorgeous satin ribbon, flowers and pearls from The Ribbon Girl, and kept the second one flat so that it can maybe double up as a keepsake bookmark.


Card Recipe:

I've been inspired by:
Happy crafting
Annette
xx


Sunday, 1 January 2017

Little Butterfly

Happy New Year everyone.  I hope you're not feeling too fragile still this afternoon. I have to admit that although I was awake for the fireworks, I was in bed before midnight.  Despite that, I still managed to lie in until 10am this morning too though!

Anyways, to start the new year I have a sweet little birthday card made for a Dutch friend whose nickname is Little Butterfly. I water-coloured the Tiddly Inks image with DI reinkers but added some Sakura Stardust to the butterfly which you can see a bit better in her close-up below.  She's currently in transit across the channel, but I don't think she's in danger of being seen before her birthday.


Card Recipe:
I've been inspired by:
Happy crafting
Annette
xx